[C++ 정리] 정적 & 동적 메모리 할당 2015-06-15

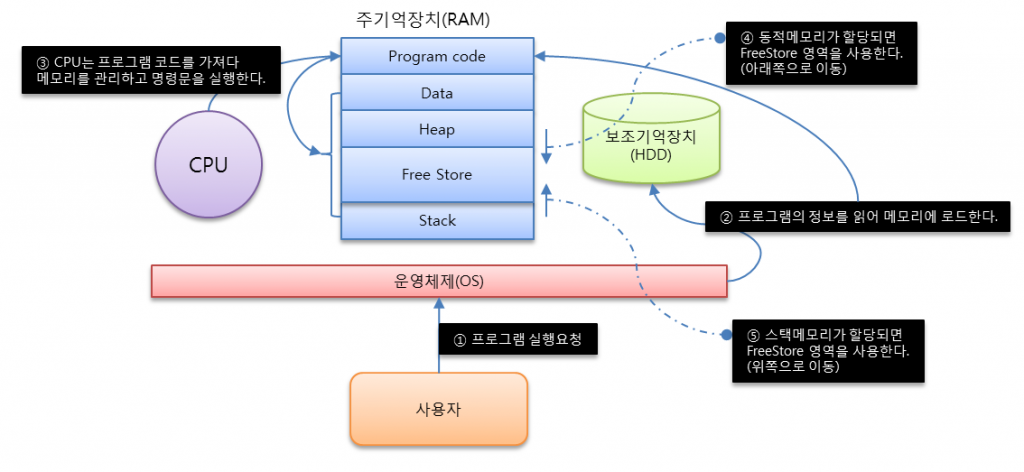
메모리가 운영되는 방식에 대한 이해를 위해 다음 그림을 보도록 하자.

memory

프로그램이 실행되고 동작하는 원리

① 사용자가 운영체제를 통해 프로그램 실행을 요청한다.
② 하드디스크에 저장되어있던 프로그램을 작동시키기 위해 메모리의 프로그램 코드 영역에 올린다.
③ CPU는 프로그램 코드를 읽어 호출규약(Calling Convention)에 의해 메모리를 관리하고 명령문들을 실행한다.
④ 프로그램 실행을 위해 동적메모리가 할당되면 FreeStore 영역을 사용하게 된다.(아래로 넓힌다.)
⑤ 시스템이 작동하기 위해 CPU가 임시적인 정보를 스택에 저장하게 되면 FreeStore 영역을 사용하게 된다.(위로 넓힌다.)
※ Heap메모리와 Stack메모리의 많은 사용으로 FreeStore영역이 없어져 만나게 된다면 메모리가 부족한 상태가 된다.

메모리 영역별 설명

* Program Code : 실행한 프로그램의 코드가 저장되어있다.
* Data : 전역변수와 static변수가 할당되고 프로그램 종료시까지 남아있다.
* Heap : 동적으로 할당된 메모리영역이며 프로그래머에 의해 할당(new(CPP) or malloc(C)) / 해제(delete(CPP) or free(C)) 된다.
* Stack : 지역변수와 매개변수가 할당되고 함수를 빠져나가면 자동 소멸된다.

프로그램 개발시에는 3가지 영역으로 이해하고 있으면 된다.

* Static 메모리 : 데이터 영역에 저장되고 지속성이 보장됨.
* Heap 메모리 : 힙 영역에 저장되고 지속성이 보장되나 프로그래머에의해 꼼꼼한 관리(메모리 해제)가 필요함.
* Stack 메모리 : 스택 영역에 저장되고 함수를 빠져나가면 자동 소멸됨.
※ 정적메모리 = (전역변수, static변수, 지역변수, 매개변수 저장) // 동적메모리 = (프로그램 실행중 생성되고 소멸되는 변수 저장)

동적메모리 할당

memory2

#include "stdafx.h"
#include <iostream>

using namespace std;

int _tmain(int argc, _TCHAR* argv[])
{
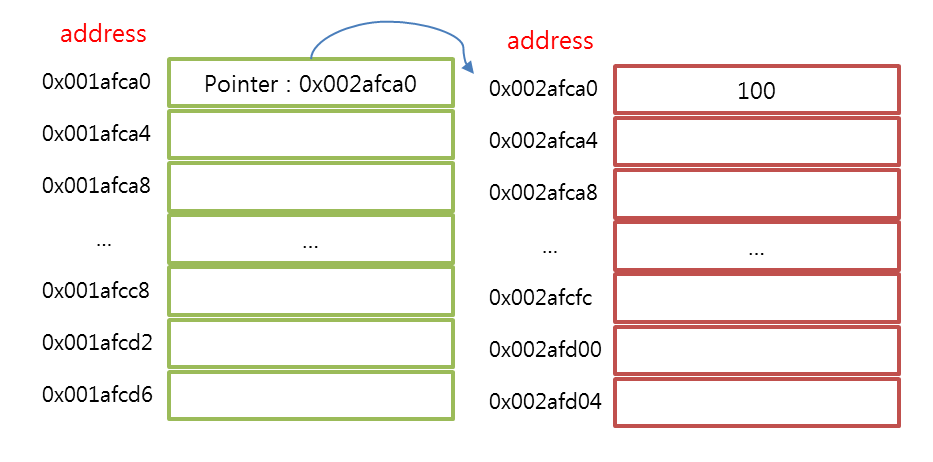
	int* pointer = new int[100];

	pointer[10] = 100;	

	cout << "pointer Address : " << &pointer << "\n";
	cout << "new Address : " << pointer << "\n";
	cout << "value Address : " << pointer[10] << "\n";	

	//delete[] pointer;
	delete[] pointer;
	// 동적으로 할당한 int[100]은 해제하였더라도
	// 정적으로 할당된 pointer는 쓰레기 값을 가지게 되므로 NULL로 초기화해 안전하게 하자.
	// ※ 해제한 메모리를 또 해제할 경우 에러가 발생해 프로그램동작이 멈추게 된다.
	pointer = NULL;
	cout << "init Address : " << pointer << "\n";

	// pointer를 NULL로 초기화(메모리 주소값이 NULL일경우 아무일도 하지 않는다)
	// 했기 때문에 실수로 다시 해제를 하였더라도 문제가 없다.
	delete[] pointer;

	// new => delete, new[] => delete[] 로 쌍을 맞춰서 사용한다.
	// - 쌍을 맞추기 않을 경우 일부만 해제되는 등의 문제가 발생할 수 있다.
	int* onePointer = new int;
	*onePointer = 100;
	delete onePointer;

	return 0;
}
* 메모리를 동적으로 할당하고 해제한다.
* 메모리 해제 후 포인터는 NULL로 꼭 초기화해 에러를 방지한다.
* new => delete, new[] => delete[] 로 쌍을 맞춰서 사용한다.

[C++ 정리] 포인터형 함수 2015-06-15

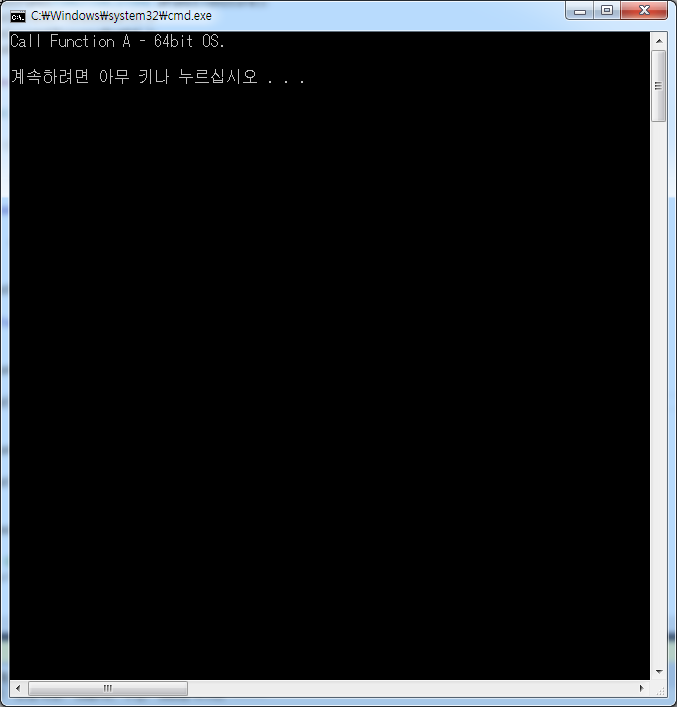
함수 또한 변수와 마찬가지로 메모리의 일부영역을 차지하고 있어 참조가 가능하고 이를 파라미터로 넘길 수도 있다. 다음예제는 OS를 구분하여 함수를 구분하여 실행할 수 있도록 함으로써 함수 내부에서는 OS버전에 관계없이 함수를 호출할 수 있게 해준다.

#include "stdafx.h"
#include <iostream>
#include <windows.h>

using namespace std;

typedef void(*FUNCTION_STORE) ();

void FunctionA();
void FunctionB();
void TestFunc(FUNCTION_STORE pFunctionStore);
BOOL IsCurrentProcess64bit();
BOOL IsCurrentProcessWow64();
BOOL Is64BitWindows();

int _tmain(int argc, _TCHAR* argv[])
{	
	FUNCTION_STORE pFunction;	

	if (Is64BitWindows())
	{
		// 64비트의 경우 FunctionA를 참조
		pFunction = &FunctionA;
	}
	else
	{
		// 64비트가 아닐경우 FunctionB를 참조
		pFunction = &FunctionB;
	}	

	// 구분된 함수를 인자로 전달
	TestFunc(pFunction);

	return 0;
}

void FunctionA()
{
	cout << "Call Function A - 64bit OS.\n\n";
}

void FunctionB()
{
	cout << "Call Function B - 32bit OS.\n\n";
}

void TestFunc(FUNCTION_STORE pFunctionStore)
{
	// OS 버전과 관계없이 동일 코드를 실행한다.
	(*pFunctionStore)();
}

BOOL IsCurrentProcess64bit()
{
#if defined(_WIN64)
	return TRUE;
#else
	return FALSE;
#endif
}

BOOL IsCurrentProcessWow64()
{
	BOOL bIsWow64 = FALSE;
	typedef BOOL(WINAPI *LPFN_ISWOW64PROCESS)(HANDLE, PBOOL);
	LPFN_ISWOW64PROCESS fnIsWow64Process;

	fnIsWow64Process = (LPFN_ISWOW64PROCESS)
		GetProcAddress(GetModuleHandle(TEXT("kernel32")), "IsWow64Process");
	if (!fnIsWow64Process)
		return FALSE;

	return fnIsWow64Process(GetCurrentProcess(), &bIsWow64) && bIsWow64;
}

BOOL Is64BitWindows()
{
	if (IsCurrentProcess64bit())
		return TRUE;

	return IsCurrentProcessWow64();
}

function3

[C++ 정리] 함수로 인자를 전달하는 유형 2015-06-15

자료의 형태별로 함수에 인자를 전달하는 방법을 정리해본다.

#include "stdafx.h"
#include <iostream>

using namespace std;

int TestFuncBasic(int arg1, int arg2);
void TestFuncPointer(int arg1, int* arg2);
void TestFuncReference(int arg1, int& arg2);
void TestFuncArray(char arg[]);
void TestFuncMultiArray(int arg1[][2], int arg2[][2][2]);

int _tmain(int argc, _TCHAR* argv[])
{
	// Ex1> basic : 변수를 전달하고 리턴을 받는다.
	int valueBasic1 = 100;
	int valueBasic2 = 100;
	int valueBasicReturn;
	valueBasicReturn = TestFuncBasic(valueBasic1, valueBasic2);

	cout << "Ex1> " << valueBasicReturn << "\n";

	// Ex2> pointer : 변수와 포인터를 전달하고 포인터를 활용해 계산된 값을 읽는다.
	int valuePointer1 = 100;
	int valuePointerReturn = 0;
	int* valuePointer2 = &valuePointerReturn;
	TestFuncPointer(valuePointer1, valuePointer2);

	cout << "Ex2> " << valuePointerReturn << "\n";

	// Ex3> reference : 변수를 전달하고 참조를 이용해 계산된 값을 읽는다.
	int valueReference1 = 100;
	int valueReference2 = 100;
	TestFuncReference(valueReference1, valueReference2);

	cout << "Ex3> " << valueReference2 << "\n";

	// Ex4> array : 배열 전달하고 참조를 이용해 수정된 값을 읽는다.
	// ※ 실제로는 포인터를 전달함에 유의할것
	char valueArray[100] = "Array Tast";

	TestFuncArray(valueArray);

	cout << "Ex4> " << valueArray << "\n";

	// Ex5> array : 다차원 배열 전달시에는 맨앞쪽 대괄호를 비워둔다.
	int multiArray1[2][2] = {
		{ 1, 2 },
		{ 3, 4 }
	};
	int multiArray2[2][2][2] = {
		{
			{ 1, 2 },
			{ 3, 4 }
		},
		{
			{ 5, 6 },
			{ 7, 8 }
		}
	};

	TestFuncMultiArray(multiArray1, multiArray2);

	cout << "Ex5> " << multiArray1[0][0] << "  //  " << multiArray2[0][0][0] << "\n";

	return 0;
}

int TestFuncBasic(int arg1, int arg2)
{
	return arg1 + arg2;
}

void TestFuncPointer(int arg1, int* arg2)
{
	*arg2 = arg1 + 100;
}

void TestFuncReference(int arg1, int& arg2)
{
	arg2 = arg1 + 100;
}

void TestFuncArray(char arg[])
{
	arg[7] = 'e';
}

void TestFuncMultiArray(int arg1[][2], int arg2[][2][2])
{
	arg1[0][0] = 2;
	arg2[0][0][0] = 2;
}
함수에 인자를 전달함에 있어 메모리가 어떻게 운영되는지 유념할 필요가 있다.
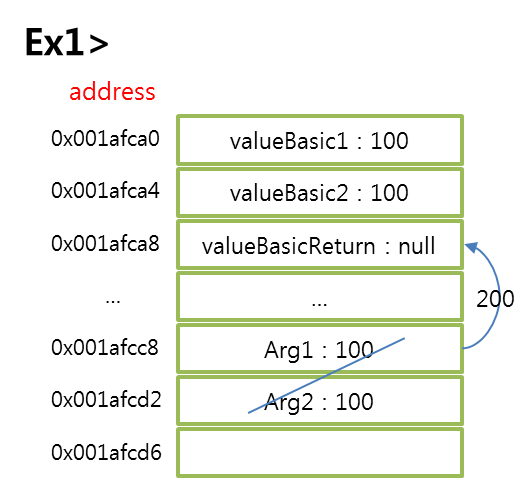
Ex1>방식의 경우 전달 하고자하는 인자와 함수에서 전달받은 인자를 저장하는 부분에서 메모리를 2배로 사용하게 되어 성능상의 불리한 점이 있다.
다음 그림을 참고하도록 한다.

Ex1>
function1

* main에서는 valueBasic1, valueBasic2, valueBasicReturn 세개의 값이 메모리를 차지하고 있다.
* TestFuncBasic를 호출하면 arg1, arg2가 메모리에 올려지고 계산된 값을 반환함과 동시에 소멸된다.

Ex2>
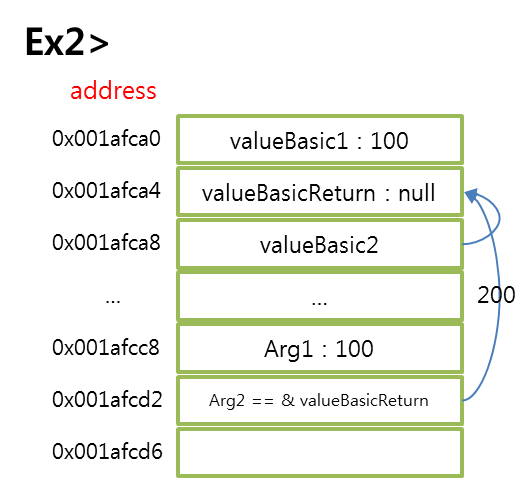
function2

* main에서는 valueBasic1, *valueBasic2, valueBasicReturn 세개의 값이 메모리를 차지하고 있다.
* 포인터변수 *valueBasic2는 valueBasicReturn의 주소값을 가지고 있다.
* 함수를 호출하면 전달된 포인터변수가 가리키는 값에 계산결과를 넣는다.