[C++ 정리] 클래스 기본형태 및 인라인, const 함수의 사용 2015-06-22

객체지향 프로그래밍을 위해 다음과 같이 클래스를 선언하고 사용한다. 일반적으로 클래스의 선언은 *.h파일에 구현은 *.cpp에 포함 시킨다.

#include "stdafx.h"
#include <iostream>

using namespace std;

// 일반적으로 *.h 파일에 정의
class MyClass
{	
public:
	MyClass();
	// 생성자 오버로딩 (EX1)
	MyClass(int x, int y);
	int getArea();
	int getArea(bool isConst) const;
	// 외부에 선언한 인라인 함수
	void MyClass::inlineFunction();

protected:

private:
	int width;
	int height;
	int area;

};

// - END header

// 일반적으로 *.cpp 파일에 정의
MyClass::MyClass()
{
	width = 0;
	height = 0;
	area = 0;
}

// 생성자로 멤버를 초기화하는 방법 (EX2)
MyClass::MyClass(int x, int y):width(x), height(y), area(x*y){}

// - END cpp

// 넓이를 얻어오는 방법
int MyClass::getArea()
{
	return area;
}

int MyClass::getArea(bool isConst) const
{
	/*
	// - const 함수에서 멤버변수 수정은 불가능하다. (읽기만 가능하다)
	if (isConst)
		area = area + 100;
	*/
	return area;
}

// 외부에 선언한 인라인 함수 (EX3)
inline void MyClass::inlineFunction() 
{
	cout << "인라인함수 테스트" "\n";
}

int _tmain(int argc, _TCHAR* argv[])
{
	// 인자없는 생성자
	MyClass myClass1;
	cout << myClass1.getArea() << "\n";

	// 오버로딩된 생성자
	MyClass myClass2(10,20);
	cout << myClass2.getArea() << "\n";

	// 인라인 함수의 실행
	myClass1.inlineFunction();

	// const 멤버함수 테스트 : const 멤버함수에서는 멤버변수의 값을 변경할 수 없다. (EX4)
	MyClass myClass3(20, 30);
	cout << myClass3.getArea(true) << "\n";

	// const 객체 : const 객체는 const 멤버함수만 호출할 수 있다.
	const MyClass myClass4(30, 40);
	cout << myClass4.getArea(true) << "\n";
	// [ERROR] - 아래는 일반함수를 접근하였기 때문에 에러가 발생한다.
	// cout << myClass4.getArea() << "\n";
	
	return 0;
}
* (EX1) 생성자 또한 오버로딩하여 사용할 수 있다.
* (EX2) ":width(x), height(y), area(x*y)" 와 같이 생성자 구현 부에서 멤버변수를 초기화 할 수 있다.
* (EX3) 인라인 함수를 사용하면 실제로는 main에 함수 내용이 구현되어 있는것과 같이 동작해 성능향상을 가져올 수 있으나 메모리에 로딩하는 것이 부담이 될 정도로 코드가 길다면 역효과를 낼 수 있다.
* (EX4) const 로 선언된 멤버함수에서는 멤버변수의 값을 변경할 수 없다.
* (EX5) const 로 선언된 객체는 const 멤버함수만 호출 가능하다.

[C++ 정리] 객체지향 프로그래밍 및 관련 개념 2015-06-22

객체 지향 프로그래밍(Object-Oriented Programming, OOP) : 프로그래밍 패러다임의 하나로 프로그램을 객체들의 모임으로 보고 개발하는 것이다. 유연하고 변경이 용이하여 대규모 소프트웨어 개발에 많이 사용된다.

장점

* 유연하고 변경이 용이하다. (프로그램의 구조를 파악하기 쉬워 개발과 보수가 간편)

단점

* 지나치게 객체화 하는 것은 실제의 개념과 너무 달라서 이해하기가 쉽지 않아질 수 있다.

특성

* 크게 다음 네가지의 동작 과정이 있다.
  - 클래스(class) : 추상 자료형(빵틀)
  - 객체(object) : 추상 자료형의 인스턴스(빵틀을 통해 만들어진 빵)
  - 메소드(method) : 추상 자료형에 정의된 연산(빵을 자르는 명령)
  - 메시지(message) : 메소드의 호출(빵을 자르는 명령을 실행)
* 클래스는 정보은닉(Data Hiding)을 위해 캡슐화(Encapsulation)를 지향해야 한다.
  : 내부 구현내용은 보이지 않도록 하고 약속된 부분만을 보이도록 지정한다.
  => 새로운 클래스에서 약속되지 않은부분을 추측해서 개발 했을 경우 문제가 발생할 수 있다.
* 기존 클래스의 기능을 상속(Inheritance)받는다.
  : 하위 클래서에서는 기존 기능을 응용해 추가적인 요구사항을 개발할 수 있다.
  => 클래스간의 종속관계를 형성시켜 객체를 조직화할 수 있고 소스코드의 재사용성을 더해준다.
* 2개 이상의 클래스로부터 상속받을 수 있다.(다중상속)
  => 클래스의 상속관계에 혼란을 줄 수 있으므로 주의해야한다.
* 다형성(polymorphism)을 위해 다음과 같은 개념을 사용한다.
  : 객체의 메소드를 여러가지 개념으로 사용 되도록 할 수 있다.
  => 클래스의 상속관계에서 가상함수(Virtual Functions)를 사용
  => 메소드를 오버라이딩(Overriding - 같은 이름의 메소드가 여러 클래스에서 다른기능을 하는것)
     ※ 오버라이딩을 위해 순수가상함수(Pure Virtual Functions)를 정의한다.
     ※ 순수가상함수가 1개 이상 선언된 클래스를 추상클래스(Abstract Class)라 부른다.
  => 메소드를 오버로딩(Overloading - 같은 이름의 메소드가 인자의 갯수나 자료형에 따라서 다른 기능을 하는것)
#include "stdafx.h"
#include <iostream>

using namespace std;

// Ex1> 클래스(Class)의 선언
class Dot
{
public:
	Dot();
	// Ex2> 생성자 Dot을 오버로딩(Overloading) 한다.
	Dot(int x, int y)
	{
		this->x = x;
		this->y = y;
	}
	int x;
	int y;
	// Ex3> 가상함수(Virtual Functions)를 선언한다.
	virtual int Cal()
	{
		return this->x - y;
	}
	// Ex4> 일반 멤버함수를 선언한다.
	void NotVirtual()
	{
		cout << "DOT CALL\n";
	}
	// Ex5> 순수가상함수(Pure Virtual Functions)를 선언한다.
	virtual void PureVirtual() const = 0;
};

// Ex6> Dot 클래스를 상속(Inheritance) 받는다.
class DotA:public Dot
{
public:
	DotA();
	DotA(int x, int y);
	// virtual는 생략가능하다.
	virtual int Cal()
	{
		return this->x + this->y;
	}
	void NotVirtual()
	{
		cout << "DOTA CALL\n";
	}
	virtual void PureVirtual() const
	{
		cout << "DOTA CALL\n";
	}
};
DotA::DotA(int x, int y):Dot(x, y)
{
	cout << "SET DotA\n";
}

class DotB :public Dot
{
public:
	DotB();
	DotB(int x, int y);
	// virtual는 생략가능하다.
	virtual int Cal()
	{
		return this->x * this->y;
	}
	void NotVirtual()
	{
		cout << "DOTB CALL\n";
	}
	virtual void PureVirtual() const
	{
		cout << "DOTB CALL\n";
	}
};
DotB::DotB(int x, int y) :Dot(x, y)
{
	cout << "SET DotB\n";
}

int _tmain(int argc, _TCHAR* argv[])
{
	// 가상함수의 사용
	Dot* dot[2] = {};
	// Ex7> 객체 생성
	dot[0] = new DotA(100, 20);
	dot[1] = new DotB(100, 20);

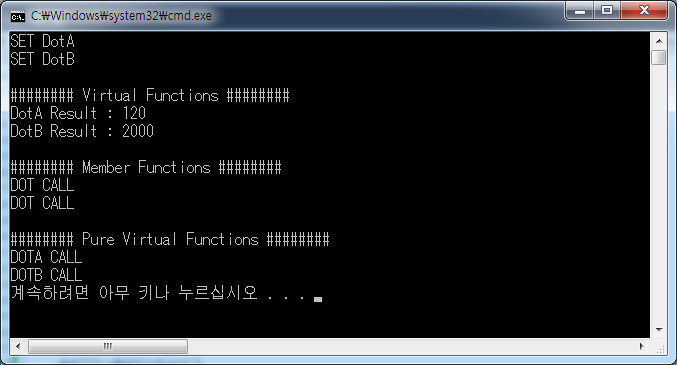
	cout << "\n######## Virtual Functions ########\n";
	// 가상함수의 사용
	cout << "DotA Result : " << dot[0]->Cal() << "\n";
	cout << "DotB Result : " << dot[1]->Cal() << "\n";

	cout << "\n######## Member Functions ########\n";
	// 일반멤버함수의 사용
	dot[0]->NotVirtual();
	dot[1]->NotVirtual();

	cout << "\n######## Pure Virtual Functions ########\n";
	// 순수가상함수의 사용
	dot[0]->PureVirtual();
	dot[1]->PureVirtual();

	// Ex8> 추상클래스(Abstract Class) 생성
	// 순수가상함수"virtual void PureVirtual() const = 0;"를 선언하므로써 Dot은 추상클래스(Abstract Class)가 되었다.
	// 즉, 추상클래스는 말그대로 추상화된 클래스(구체화 되지않은 클래스)이기 때문에 상속받아 구현을 해야만 사용할 수 있다.
	// Error - 추상클래스를 상속받은 클래스를 생성하지 않고 그냥 생성하였다.
	// Dot dotTest = new Dot(100, 20);

	return 0;
}
Ex1> 클래스(Class) 선언
Ex2> 오버로딩(Overloading)
Ex3> 가상함수(Virtual Functions) 선언
Ex4> 멤버함수 선언
Ex5> 순수가상함수(Pure Virtual Functions) 선언
Ex6> 클래스 상속(Inheritance)
Ex7> 객체(object) 생성
Ex8> 추상클래스(Abstract Class) 생성

object

[Data Structure] 연결리스트(Linked List)의 구현 2015-06-19

상황에 맞게 최적의 성능을 내고 싶을 경우 연결리스트를 직접 구현해 사용하기도 한다. 원형 이중 연결리스트를 C++로 구현해 보았다. 노드가 어디에 추가되건 편리하게 사용할 수 있는 장점이 있다. 선형의 경우도 아래 소스를 참고하여 손쉽게 구현할 수 있다.

circulardoublylinkedlist

#include "stdafx.h"
#include <iostream>

using namespace std;

struct User
{
	char name[20];
	char email[40];
};

template<typename T>
class Node
{
	template<typename T>
	friend class MyContainer;
private:
	Node* prev;
	Node* next;
	T* data;
public:
	Node() { this->prev = NULL; this->next = NULL; this->data = NULL; }
	Node(T* data) { this->prev = NULL; this->next = NULL; this->data = data; }
	Node(T* data, Node* prev, Node* next) { this->prev = prev; this->next = next; this->data = data; }
};

template<typename T>
class MyContainer
{
private:
	Node<T>* head = new Node<T>();
public:
	// 자신을 가리키도 데이터가 NULL인 헤더를 만든다.
	MyContainer() { this->head->prev = this->head; this->head->next = this->head; this->head->data = NULL; }
	~MyContainer() {
		this->deleteContainer();
		delete this->head;
	}

	// 생성
	Node<T>* createNode(T* data)
	{
		// data를 저장할 동적메모리 할당
		T* newData = new T(*data);

		// node를 저장할 동적메모리 할당
		//  - newNode->prev = lastNode (prev는 마지막 노드를 가리킨다.)
		//  - newNode->next = firstNode (next는 첫번째 노드(head)를 가리킨다.)		
		Node<T>* newNode = new Node<T>(newData, this->head->prev, this->head);
		
		// 노드가 삽입될 양옆의 노드 정보를 변경한다.				
		if (this->head == this->head->next)
		{
			// 최초 생성일 경우
			this->head->next = newNode;
		}
		else
		{
			// 최초 생성이 아닐 경우
			this->head->prev->next = newNode;
		}

		// firstNode->prev (첫번째 노드의 prev는 새로운 노드를 가리킨다.)
		// lastNode->next (마지막 노드의 next는 새로운 노드를 가리킨다.)
		this->head->prev = newNode;

		return newNode;
	}	

	// 삭제
	void deleteNode(Node<T>* node)
	{
		// 이전노드와 다음노드를 연결한다.
		node->prev->next = node->next;
		node->next->prev = node->prev;

		// 자신을 메모리에서 삭제
		delete node->data;
		delete node;
	}

	// 컨테이너 삭제
	void deleteContainer()
	{
		if (this->head->next != this->head)
		{
			// head 만 남지 않았으면 다음노드 삭제하고 재귀호출
			this->deleteNode(this->head->next);
			this->printAll();
			this->deleteContainer();			
		}	
	}

	// 전체 출력 : 적용시 삭제
	void printAll()
	{	
		if (this->head != NULL)
		{
			cout << "\n### head Node ###\n";
			cout << "HEAD : " << this->head << "\n";
			cout << "PREV : " << this->head->prev << "\n";
			cout << "NEXT : " << this->head->next << "\n";
			cout << "DATA : " << this->head->data << "\n";
			cout << "\n";

			cout << "### Node List ###\n";
			if (this->head->next != NULL)
			{
				for (Node<T>* currentNode = this->head->next; currentNode != this->head; currentNode = currentNode->next)
				{
					User* tmpUser = (User*)currentNode->data;
					cout << "[<-" << currentNode->prev << "]";
					cout << "[" << currentNode << "]";
					cout << "[" << currentNode->next << "->]";
					cout << " NAME : " << tmpUser->name << "\n";
				}
			}
		}
	}
};

int _tmain(int argc, _TCHAR* argv[])
{
	const int INSERT_SIZE = 5;

	MyContainer<User> myContainer;
	Node<User>* newNode[INSERT_SIZE];
	
	// Sample1. CreateNode : INSERT_SIZE 만큼 데이터를 입력
	for (int i = 0; i < INSERT_SIZE; i++)
	{
		User user;		
		cout << "insert name : ";
		cin.getline(user.name, 20);
		cout << "insert email : ";
		cin.getline(user.email, 40);
		
		newNode[i] = myContainer.createNode(&user);
	}
	myContainer.printAll();

	// Sample2. deleteNode : 2번째 노드를 삭제
	myContainer.deleteNode(newNode[1]);
	myContainer.printAll();

	// Sample3. deleteContainer : 전체 노드를 삭제 / 삭제해주지 않아도 소멸시 자동삭제되도록 구현한다.
	myContainer.deleteContainer();

	return 0;
}