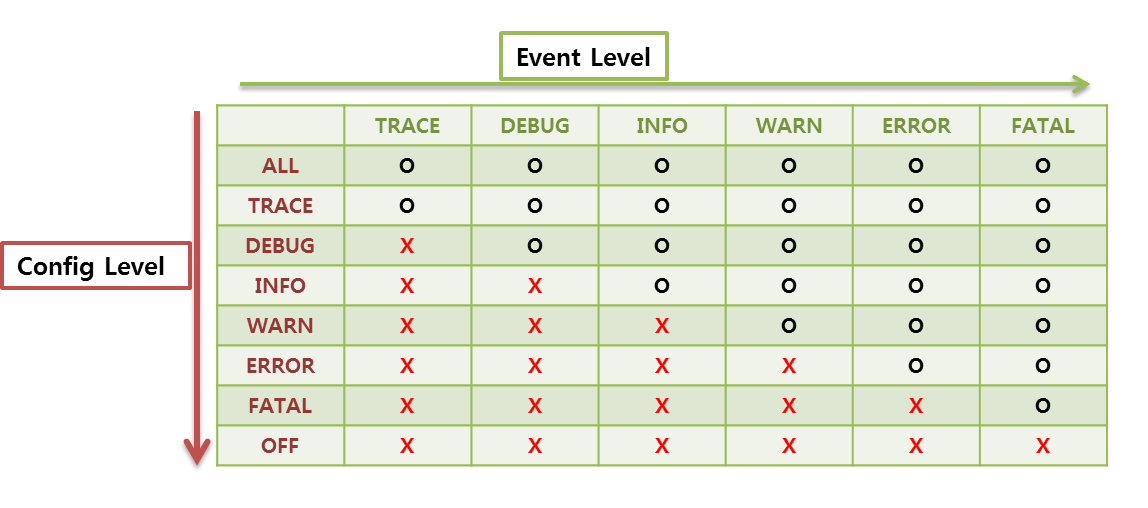
log4j에서는 6단계의 Event Level로 구분하여 로그를 기록하는데 Config Level의 설정에 따라 다음과 같이 로그를 설정 할 수 있다.

>>> LEVEL 설정
ALL – The ALL has the lowest possible rank and is intended to turn on all logging.
=> 모든 로깅.
TRACE – The TRACE Level designates finer-grained informational events than the DEBUG
=> 세밀
DEBUG – The DEBUG Level designates fine-grained informational events that are most useful to debug an application.
=> 디버깅.
INFO – The INFO level designates informational messages that highlight the progress of the application at coarse-grained level.
=> 강조 정보.
WARN – The WARN level designates potentially harmful situations.
=> 경고.
ERROR – The ERROR level designates error events that might still allow the application to continue running.
=> 오류.
FATAL – The FATAL level designates very severe error events that will presumably lead the application to abort.
=> 심각한 오류.
OFF – The OFF has the highest possible rank and is intended to turn off logging.
=> 로깅 해제.
>>> 출력 패턴(ConversionPattern) 설정
%m: 로그 내용 출력
%p: debug, info, warn, error, fatal 등의 priority 출력
%r: 어플이 시작 후 이벤트가 발생하는 시점까지의 경과시간 밀리세컨드로 출력
%c: package 출력
%c{n}: n(숫자) 만큼의 package를 가장 하단 부터 역으로 출력
예) %c{2} 일때 a.b.c 는 b.c 로 출력된다.
%n: 개행문자 출력. 플렛폼에 따라 \r\n 또는 \n 출력.
%d: 이벤트 발생 날짜 출력 ( 프로그램의 실행속도를 느리게 한다.)
예) %d{HH:mm:ss} 또는 %d{dd MMMM yyyy HH:mm:ss}
%C: 호출자의 클래스명 출력
예) %C{2} 일때 a.b.c.TestClass 는 c.TestClass 로 출력된다.
%M: method 이름.
%F: 프로그램 파일명.
%l: caller의 정보
%L: caller의 라인수
%x: thread와 관련된 NDC(nested diagnostic context)
%X: thread와 관련된 MDC(mapped diagnostic context)
%%: % 표시를 출력
%t: 쓰레드 이름