[문제해결] JAVA AES256 암호화 2015-03-25

1. 문제상황

JAVA로 AES256 암호화시 다음과 같은 에러가 발생하였다.

3월 25, 2015 11:22:19 오전 org.apache.catalina.core.StandardWrapperValve invoke
심각: Servlet.service() for servlet [appServlet] in context with path [/roger] threw exception [Request processing failed; nested exception is java.lang.reflect.UndeclaredThrowableException] with root cause
java.security.InvalidKeyException: Illegal key size
	at javax.crypto.Cipher.checkCryptoPerm(Cipher.java:1024)
	at javax.crypto.Cipher.implInit(Cipher.java:790)
	at javax.crypto.Cipher.chooseProvider(Cipher.java:849)
	at javax.crypto.Cipher.init(Cipher.java:1348)
	at javax.crypto.Cipher.init(Cipher.java:1282)

2. 문제해결

검색결과 미 통상법에 의해 자국내에서만 AES256 방식이 허용되기 때문이라고 한다. 해결을 위해서는 기존 설치된 jar 파일을 교체해야 한다.
1>> 사이트 접속
http://www.oracle.com/technetwork/java/javase/downloads/index.html
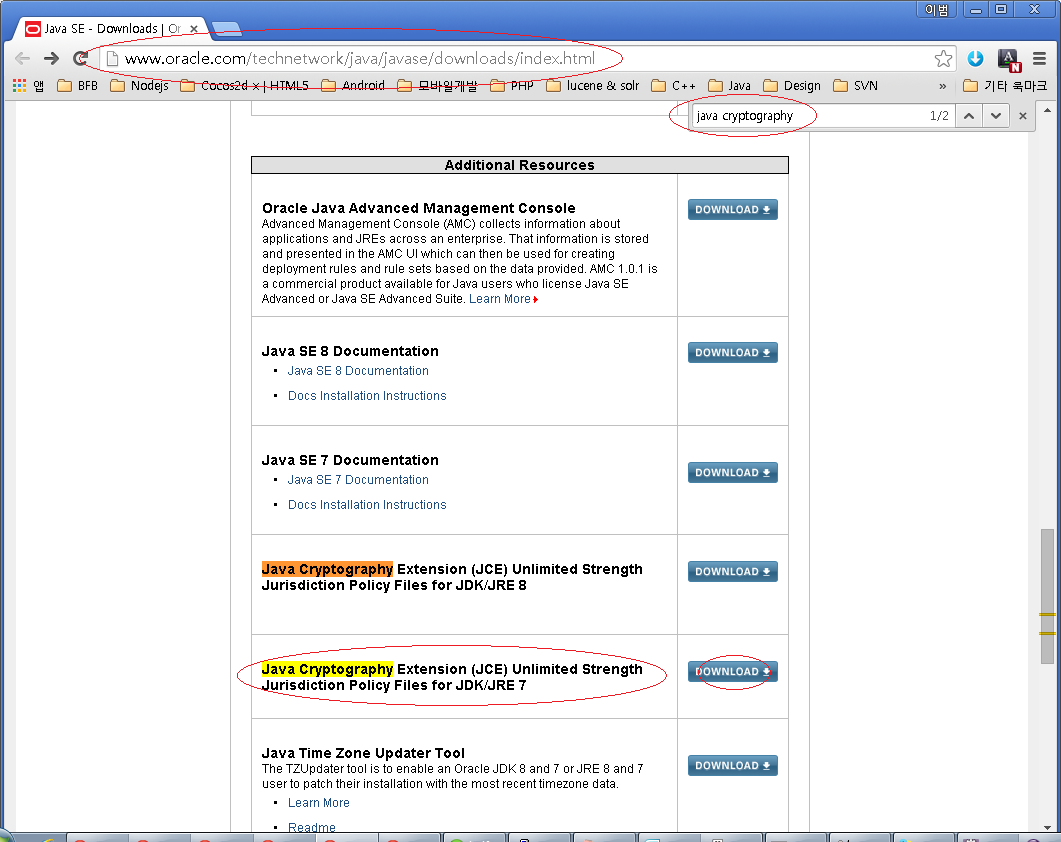
illegal key size
2>> 설치파일 다운로드

illegal key size2
3>> jar파일을 아래 경로에 덮어쓰기
{Java설치경로}/jre7/lib/security

[JAVA] log4j Level 설정 2015-03-23

log4j에서는 6단계의 Event Level로 구분하여 로그를 기록하는데 Config Level의 설정에 따라 다음과 같이 로그를 설정 할 수 있다.
log4j

>>> LEVEL 설정

ALL – The ALL has the lowest possible rank and is intended to turn on all logging.
=> 모든 로깅.
TRACE – The TRACE Level designates finer-grained informational events than the DEBUG
=> 세밀
DEBUG – The DEBUG Level designates fine-grained informational events that are most useful to debug an application.
=> 디버깅.
INFO – The INFO level designates informational messages that highlight the progress of the application at coarse-grained level.
=> 강조 정보.
WARN – The WARN level designates potentially harmful situations.
=> 경고.
ERROR – The ERROR level designates error events that might still allow the application to continue running.
=> 오류.
FATAL – The FATAL level designates very severe error events that will presumably lead the application to abort.
=> 심각한 오류.
OFF – The OFF has the highest possible rank and is intended to turn off logging.
=> 로깅 해제.

>>> 출력 패턴(ConversionPattern) 설정

%m: 로그 내용 출력
%p: debug, info, warn, error, fatal 등의 priority 출력
%r: 어플이 시작 후 이벤트가 발생하는 시점까지의 경과시간 밀리세컨드로 출력
%c: package 출력
%c{n}: n(숫자) 만큼의 package를 가장 하단 부터 역으로 출력
예) %c{2} 일때 a.b.c 는 b.c 로 출력된다.
%n: 개행문자 출력. 플렛폼에 따라 \r\n 또는 \n 출력.
%d: 이벤트 발생 날짜 출력 ( 프로그램의 실행속도를 느리게 한다.)
예) %d{HH:mm:ss} 또는 %d{dd MMMM yyyy HH:mm:ss}
%C: 호출자의 클래스명 출력
예) %C{2} 일때 a.b.c.TestClass 는 c.TestClass 로 출력된다.
%M: method 이름.
%F: 프로그램 파일명.
%l: caller의 정보
%L: caller의 라인수
%x: thread와 관련된 NDC(nested diagnostic context)
%X: thread와 관련된 MDC(mapped diagnostic context)
%%: % 표시를 출력
%t: 쓰레드 이름

[JAVA 개발환경설정] 5. Spring프로젝트 셋팅 2015-02-26

1. STS 다운로드 : Eclipse에 플러그인을 추가하여 구성할 수도 있지만 Spring에서 제공하는 Spring Tool Suite을 활용하면 빠르고 안정적으로 개발환경을 설정 할 수 있다.

>>> 다운로드

sts_download

- http://spring.io/tools/sts/all 접속
- OS환경에 맞는 zip파일 다운로드
>>> 설치 & 설정
- D:\_Development\tools에 압축해제
- D:\_Development\tools\sts-bundle\sts-3.6.3.SR1\sts.exe 의 바로가기 생성
※ 프로젝트별로 사용하고자 하는 sts 바로가기를 생성해 별도의 Workspace를 구성한다.
   ex) D:\_Development\tools\sts-bundle\sts-3.6.3.SR1\STS.exe  -data D:\_Development\source\{프로젝트명}

2. 프로젝트 생성 및 톰캣 연동 – Hello World!

>>> 프로젝트 생성

sts_new_project

- New > Select Wizard > Spring > Spring Project
- 프로젝트명 입력 & Spring MVC Project 선택
>>> 패키지명 입력

sts_package_name

- 보통 com.{회사명}.{어플리캐이션명}의 유형으로 입력
>>> 톰캣 다운로드 : 다른 프로젝트와 별도로 구성한다.
- http://tomcat.apache.org/download-70.cgi
- D:\_Development\tools\sts-bundle\tomcat 폴더에 원하는 버전의 zip파일 다운로드
- 버전별 압축해제 D:\_Development\tools\sts-bundle\tomcat\{버전}
>>> STS에서 서버 생성

sts_create_server

- Apache > Tomcat v7.0 Server [Next]
- Tomcat Installation directory > Browser > 설치한 톰캣 경로 입력 [Next]
- 생성한 서버로 실행하기 원하는 프로젝트 Add [Finish] 또는 프로젝트별 properties에서 개별 추가한다.
>>> Hello World 페이지 실행

sts_hello_world

- Run As > Run On Server
- Hello World가 보이면 서버연동이 정상완료된것이다.